Getting Started
Installing Inspectlet
Installing Inspectlet requires placing a simple Javascript code into your website. This requires little to no technical skill and can be done within a few minutes.
The Install Code
Inspectlet's Javascript code is asynchronous, which means it does not block your site while it does its own work. The embed code is designed not to slow down your site. After adding a site in your Dashboard, click the blue wrench icon in the Actions column that says "Edit this site's settings". In the Edit Site page, click on the link that says "Get Install Code" on the top right.
Your code should look something like this:
<!-- Begin Inspectlet Tracking Code -->
<script type="text/javascript">
(function() {
window.__insp = window.__insp || [];
__insp.push(['wid', 12345678]);
var ldinsp = function(){
if(typeof window.__inspld != "undefined") return; window.__inspld = 1; var insp = document.createElement('script'); insp.type = 'text/javascript'; insp.async = true; insp.id = "inspsync"; insp.src = ('https:' == document.location.protocol ? 'https' : 'http') + '://cdn.inspectlet.com/inspectlet.js?wid=12345678&r=' + Math.floor(new Date().getTime()/3600000); var x = document.getElementsByTagName('script')[0]; x.parentNode.insertBefore(insp, x); };
setTimeout(ldinsp, 0);
})();
</script>
<!-- End Inspectlet Tracking Code -->
There are a few options for installing the code:
Option 1: Copy code into your HTML
The script provided by Inspectlet (look above for an example) should be placed anywhere in your site's HTML (preferrably in the <HEAD> section). Inspectlet is loaded asynchronously in a non-blocking way so it doesn't slow down your site. If you're having trouble installing Inspectlet on your site, send us an email and we'd be happy to help!
Option 2: Installing on WordPress with the WordPress Plugin
We have a WordPress plugin that'll take care of placing the code in your site, please get it from here: Inspectlet WordPress Plugin.
Check if it's installed correctly
To debug whether Inspectlet is installed and functioning correctly, append ?inspectlet_diagnostics=true to your site URL to bring up the diagnostics console.
Suggested Next Steps
Hooray! Inspectlet is up and running! Now here are a few cool things to check out:
Excluding Sensitive Data
We take personal information and data privacy very seriously. Any data marked as sensitive is excluded from recording, therefore data entered by the user or certain HTML content present on the page is blocked from being transmitted to our servers. You can mark both input fields (like the credit card inputs on a checkout form) and HTML content (like a tax report in a DIV or TABLE) on your page as sensitive either by adding the id/class name of an element to your excluded data site setting (see below), or by adding the inspectletIgnore or inspectlet-sensitive, or other self-defined class on an HTML element in your code.
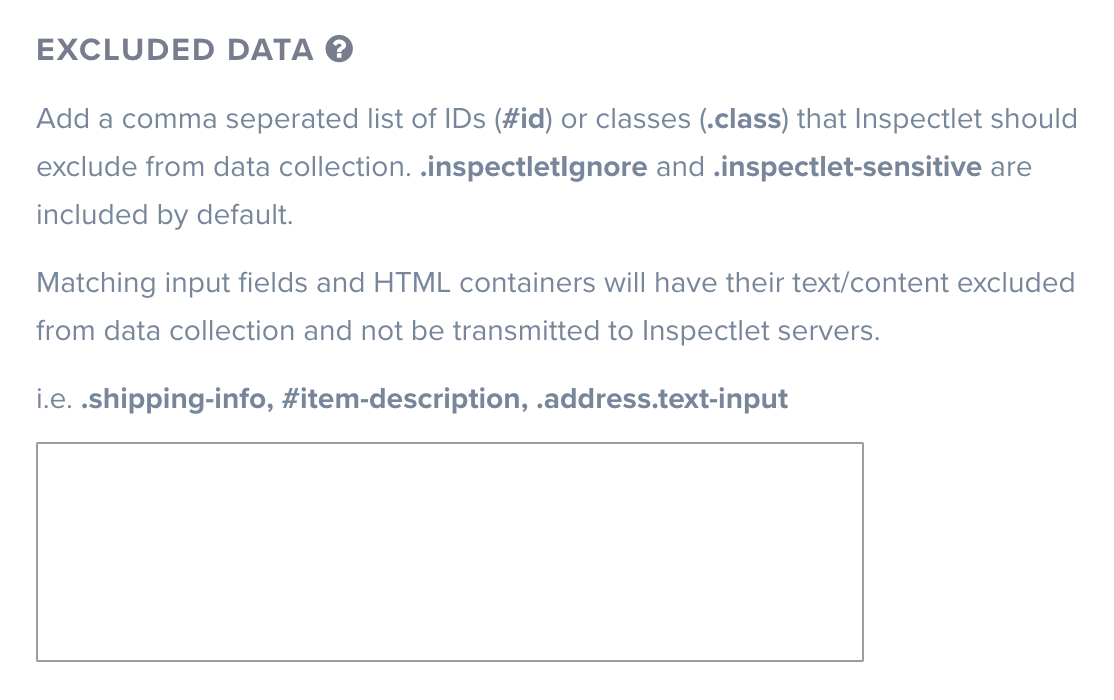
Excluded Data Setting
This site setting lets you to add a comma seperated list of HTML IDs/classes that Inspectlet should exclude from data collection. By default, .inspectletIgnore and .inspectlet-sensitive are included, but you can add more rules to identify existing elements on your pages.
Matching input fields and HTML containers will have their text/content excluded from data collection and not be transmitted to Inspectlet servers.
Excluding Input Fields
Excluded input fields will have their text content, keypresses, and values blocked from recording.
You can mark an input field as sensitive by adding its ID/class to the excluded data list (above), or by adding a sensitive class to the element in your code.
To mark an input field to be excluded in the code, for example, the following credit card input field is tagged as sensitive and any text entered in it will not be recorded:
<input type="text" class="inspectletIgnore" name="ccnumber" />
Please note that nothing is needed for password fields, Inspectlet ignores those automatically.
Excluding HTML Content on the Page
You may want to sometimes block recording of certain information on the page, you can mark that HTML content as sensitive by adding its ID/class to the excluded data list (above), or by adding a sensitive class to the element in your code whose content and children you want excluded from recording. Inspectlet will not transmit any text inside these containers or any of their children.
To mark a div with the class of "tax-data" as sensitive in your code:
<div class="tax-data inspectlet-sensitive">
...
</div>
Censoring All Input Fields on All Pages
If you'd just like to get up and running quickly, you can instead enable the site-wide setting that censors all input fields on all pages:
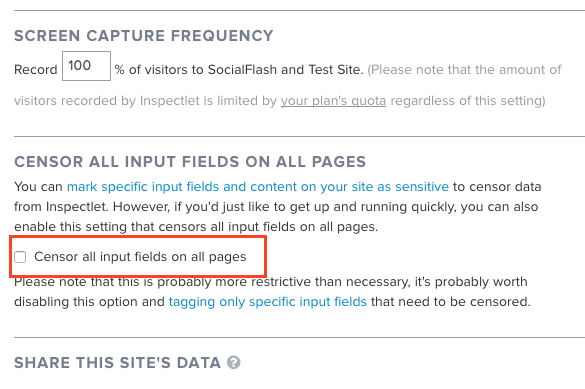
Please note that this is probably far more restrictive than necessary and will make your data less useful, it's worth disabling this option and tagging only specific input fields that need to be censored as described above.
Identifying Users
By identifying users, you can associate a session recording with a meaningful nickname (name, email address, database ID, etc). Although optional, we highly recommend identifying users to have more context around your data throughout the dashboard.
Here's an example showing how to identify a user:
__insp.push(['identify', "john@example.com"]);
The above code will associate the current session with john@example.com in the dashboard.
The identify method only needs to be called once per session and can be called at anytime during the session. You can also call identify again with a different identity in case the user's identity needs to be updated.
Tagging User Sessions
With the JavaScript tagging API, you can optionally send any metadata to Inspectlet about a user or a session. For example, you can send in the email address of the user, so that you can search against it from the Dashboard to find all recordings of that user.
You can send tags both as key/value pairs, or as simple strings.
Here's an example of tagging a session with the user's email address (key/value pair):
__insp.push(['tagSession', {email: "john@example.com"}]);
The above code creates a tag with the key "email" having the value "john@example.com".
You can also send in multiple tags in an object, for example if you wanted to send the entire identity of the user:
__insp.push(['tagSession', {email: "john@example.com", userid: "12345678", pointsEarned: "42"}]);
Tags are also useful for marking sessions where users exhibited interesting behavior, made it to the checkout page, encountered an error, etc. These tags will make sorting through numerous screen captures easier.
For example, the following Javascript code tags a session as "viewed checkout" (simple string tag):
__insp.push(['tagSession', "viewed checkout"]);
In the above case we didn't need a whole key/value, so we just supplied a simple string as a key. A tag must be a string or an object with as many key/value pairs as you want. Tags can be applied at any time and only needs to be set once to tag the entire session, but calling it multiple times (each time a page loads for example) is okay too, duplicate tags will simply be ignored.
Marking sessions where a sale is made
If you're interested in watching all screen captures where a visitor purchased something or made it to the shopping cart page, you can tag those screen captures with a marker like "purchase" like this:
__insp.push(['tagSession', "purchase"]);
This javascript snippet should be called when a visitor visits a specific page, or makes a successful purchase.
Change Page URL
This method lets you modify the URL that Inspectlet saves for the current page.
For example, you may want to change the URL http://www.example.com/user/JohnDoe to http://www.example.com/user/profile in Inspectlet's perspective, so that you can easily identify and aggregate profile pages for heatmaps. This can be done like so:
__insp.push(["pageUrl", "http://www.example.com/user/profile"]);
The above line of code needs to be in place before Inspectlet fully initializes, so please place this line in the same block as the main Inspectlet JS code. For example, the changeUrl line can be placed above your website identifier from the main Inspectlet JS(__insp.push(["wid", ...])).
Please note: changing the Page URL should not be confused with Virtual Pageviews. For example, if you're on /foo and change the page URL to /bar, the end result will be that Inspectlet will have a session with one pageview: /bar. If you're on /foo and perform a virtual pageview, Inspectlet will have a session with two pageviews: /foo, /bar. Changing the page URL lets you modify what Inspectlet is seeing for the current pageview, while the Virtual Pageview API triggers an entirely new pageview within Inspectlet.
Virtual Pageviews
This function is only needed for legacy deployments! Changes to the URL via History.pushState() are now automatically picked up by Inspectlet so the below is unnecessary.
If your site is a single page application or otherwise uses HTML5's History API (e.g. pushState) or uses hash-bangs to change application state, you can trigger a virtual pageview, which tells Inspectlet to create a new page record.
Please note: Virtual Pageviews should not be confused with changing the Page URL. For example, if you're on /foo and change the page URL to /bar, the end result will be that Inspectlet will have a session with one pageview: /bar. If you're on /foo and perform a virtual pageview, Inspectlet will have a session with two pageviews: /foo, /bar. Changing the page URL lets you modify what Inspectlet is seeing for the current page, while the Virtual Pageview API triggers an entirely new pageview within Inspectlet.
Trigger a virtualPage like this:
__insp.push(["virtualPage"]);
In single page apps made with frameworks like AngularJS, Ember, Backbone, etc, you only need to add the virtualPage call once in your routing function that faciliates page changes.
FAQ
How does Inspectlet work?
Inspectlet gives you a tiny piece of Javascript code to copy paste in your site. After installing it, Inspectlet monitors your site's visitors in real-time and relays this information back to the servers, where it's compiled and presented to you.
Inspectlet's screen capture is a component of the code that works by recording all the events that take place in the browser such as keystrokes, mouse movements, scrolling, clicking, and then sends this data (which is only bytes in size) to our servers. Once we receive this data, we compile a screen capture by overlaying the events onto the visitor's page. Inspectlet has two different techniques for screen capture, which allow it to be versatile enough to capture even the most complicated websites.
My site uses advanced technologies, will Inspectlet still work?
Absolutely! Inspectlet is designed with this century's web apps in mind. Inspectlet plays nice with all the latest technologies, even if your site is a single page app (AngularJS, Ember, Backbone) or you use lots of dynamic javascript, AJAX, HTML5, cookies, login/authentication, HTTPS/SSL, and anything else. Inspectlet is compatible with all of these technologies straight out of the box with no integration required. If you have any questions about integration, we'd be happy to help.
Will Inspectlet slow down my website?
Short answer: No, not at all.
One of the most important priorities to us while designing Inspectlet is to ensure that Inspectlet is as unobtrusive as possible. Inspectlet's Javascript code is asynchronous, which means it does not block your site while it does its own work. Inspectlet isn't even loaded until the rest of your site has finished loading and is ready. Even after it loads, it stays out of the way and momentarily sends bytes of data to our servers. Try it on your site or check out the demo.
How does Inspectlet handle subdomains?
It's completely up to you how you want to handle subdomains. Got a subdomain that needs to be tracked with another subdomain? With the main site? With a few other subdomains? Completely separately? Inspectlet doesn't care. Track your site any way you want by either making a new site from your Dashboard, or using the same embed code to track them together.
What happens if I go over my plan's quota?
By default, Inspectlet automatically staggers your monthly recorded sessions quota throughout the month. This means that Inspectlet may stop recording data after some time in the day to prevent your sites from exhausting your monthly quota before the end of the month and being left with a portion of the month without any data at all. For this reason it is recommended to keep staggering enabled. If you'd rather manage your quota yourself, you can disable this functionality.
If your usage exceeds the plan's limit then Inspectlet stops recording for that day if you have staggering enabled, otherwise for the month. Upgrading your plan will re-enable your account since since your quota is increased. We will never automatically bump you up to the next larger plan without your permission.
My site is larger than the largest plan available. What can I do?
If your needs exceed the highest plan we have available, get in touch with us and we can tailor something that fits.